We've all been there. You finish a solid new feature, your unit tests are green, and then you open the UI test suite. It's a wall of app.buttons["com.myapp.login.button"].tap(), XCTAssertTrue(app.staticTexts["Welcome"].waitForExistence(timeout: 5)), and brittle selectors that break the moment a designer renames a label. Maintaining them is a full-time job. Writing new ones from scratch feels like writing assembly.
What if instead you could just write:
try await agent.step("Log in with email user@example.com and password secret123")
try await agent.assert("The home screen is visible with a welcome message")
That's exactly what UIXCute does. It's an open-source Swift SDK that bridges XCUIAutomation with a large language model agent, letting you describe what your test should do in plain English and letting the AI figure out how to drive the app to get there.
In this article I'm going to cover:
- What UIXCute is and why I built it
- How it works under the hood (protocols, agent loop, perception modes)
- A real walkthrough of the TrackOrder demo with CoreLocation permission handling
- The LLM journey — from AWS Bedrock (Claude Haiku) to a fully local Gemma4 setup on Ollama
- Seven optimizations that took the pass rate from 7/10 to 10/10
What is UIXCute?
UIXCute is a Swift package for AI-driven automated testing of iOS apps inside Xcode. Instead of writing hardcoded selectors and timing logic, you describe test goals in natural language and an LLM agent drives the app using XCUIAutomation under the hood.
It supports two backends out of the box:
- AWS Bedrock — use Claude or another cloud model (great for CI)
- Ollama — run a model locally on your Mac (private, free, offline)
And it supports four perception modes so you can tune the trade-off between token cost and accuracy:
accessibilityTree— cheapest, uses the XCUI element hierarchyscreenshotOnly— vision-onlyscreenshotAndAccessibilityTree— highest fidelityscreenshotFallback— accessibility tree when available, screenshot otherwise
The full source is at github.com/Andrea-Scuderi/UIXCute.
Architecture
The design is protocol-driven, which makes it straightforward to swap backends or mock things in unit tests.
┌─────────────────────────────────────────────┐
│               Your XCTest                   │
│         UIXCuteAgent.step("...")            │
└────────────────────┬────────────────────────┘
                     │
                     ▼
         ┌──────────────────────┐
         │    AgentLoopProtocol │
         │  observe → think →   │
         │    act → repeat      │
         └───────┬────────┬─────┘
                 │        │
    ┌────────────▼────┐  ┌▼─────────────────────┐
    │LLMClientProtocol│  │ActionExecutorProtocol│
    │  (Bedrock /     │  │  (XCUIAutomation)    │
    │   Ollama)       │  └──────────────────────┘
    └─────────────────┘
The public API on UIXCuteAgent is just three methods:
// Run autonomously until the goal is achieved (or limits are hit)
try await agent.run(goal: "Log in and verify the home screen")

// Execute one discrete step
try await agent.step("Tap the Email field and type user@example.com")

// Assert a condition in the current UI state
try await agent.assert("A confirmation banner is visible")
UIXCuteAgent is an actor, so it's safe to call from async test functions. Every call returns an AgentExecutionReport that records each tool call, its inputs, and the result — handy for attaching to Xcode test results.
The backend is selected via the AgentBackend enum:
public enum AgentBackend: Sendable {
    case bedrock
    case ollama(baseURL: URL = URL(string: "http://127.0.0.1:11434")!, model: String)
}
And UIXCuteConfiguration lets you tune timeouts, max steps, perception mode, and logging:
let config = UIXCuteConfiguration(
    maxSteps: 40,
    stepTimeout: 15,
    totalTimeout: 180,
    perceptionMode: .accessibilityTree,
    enableLogging: true,
    logFileURL: logsDirectory.appendingPathComponent("agent.jsonl")
)
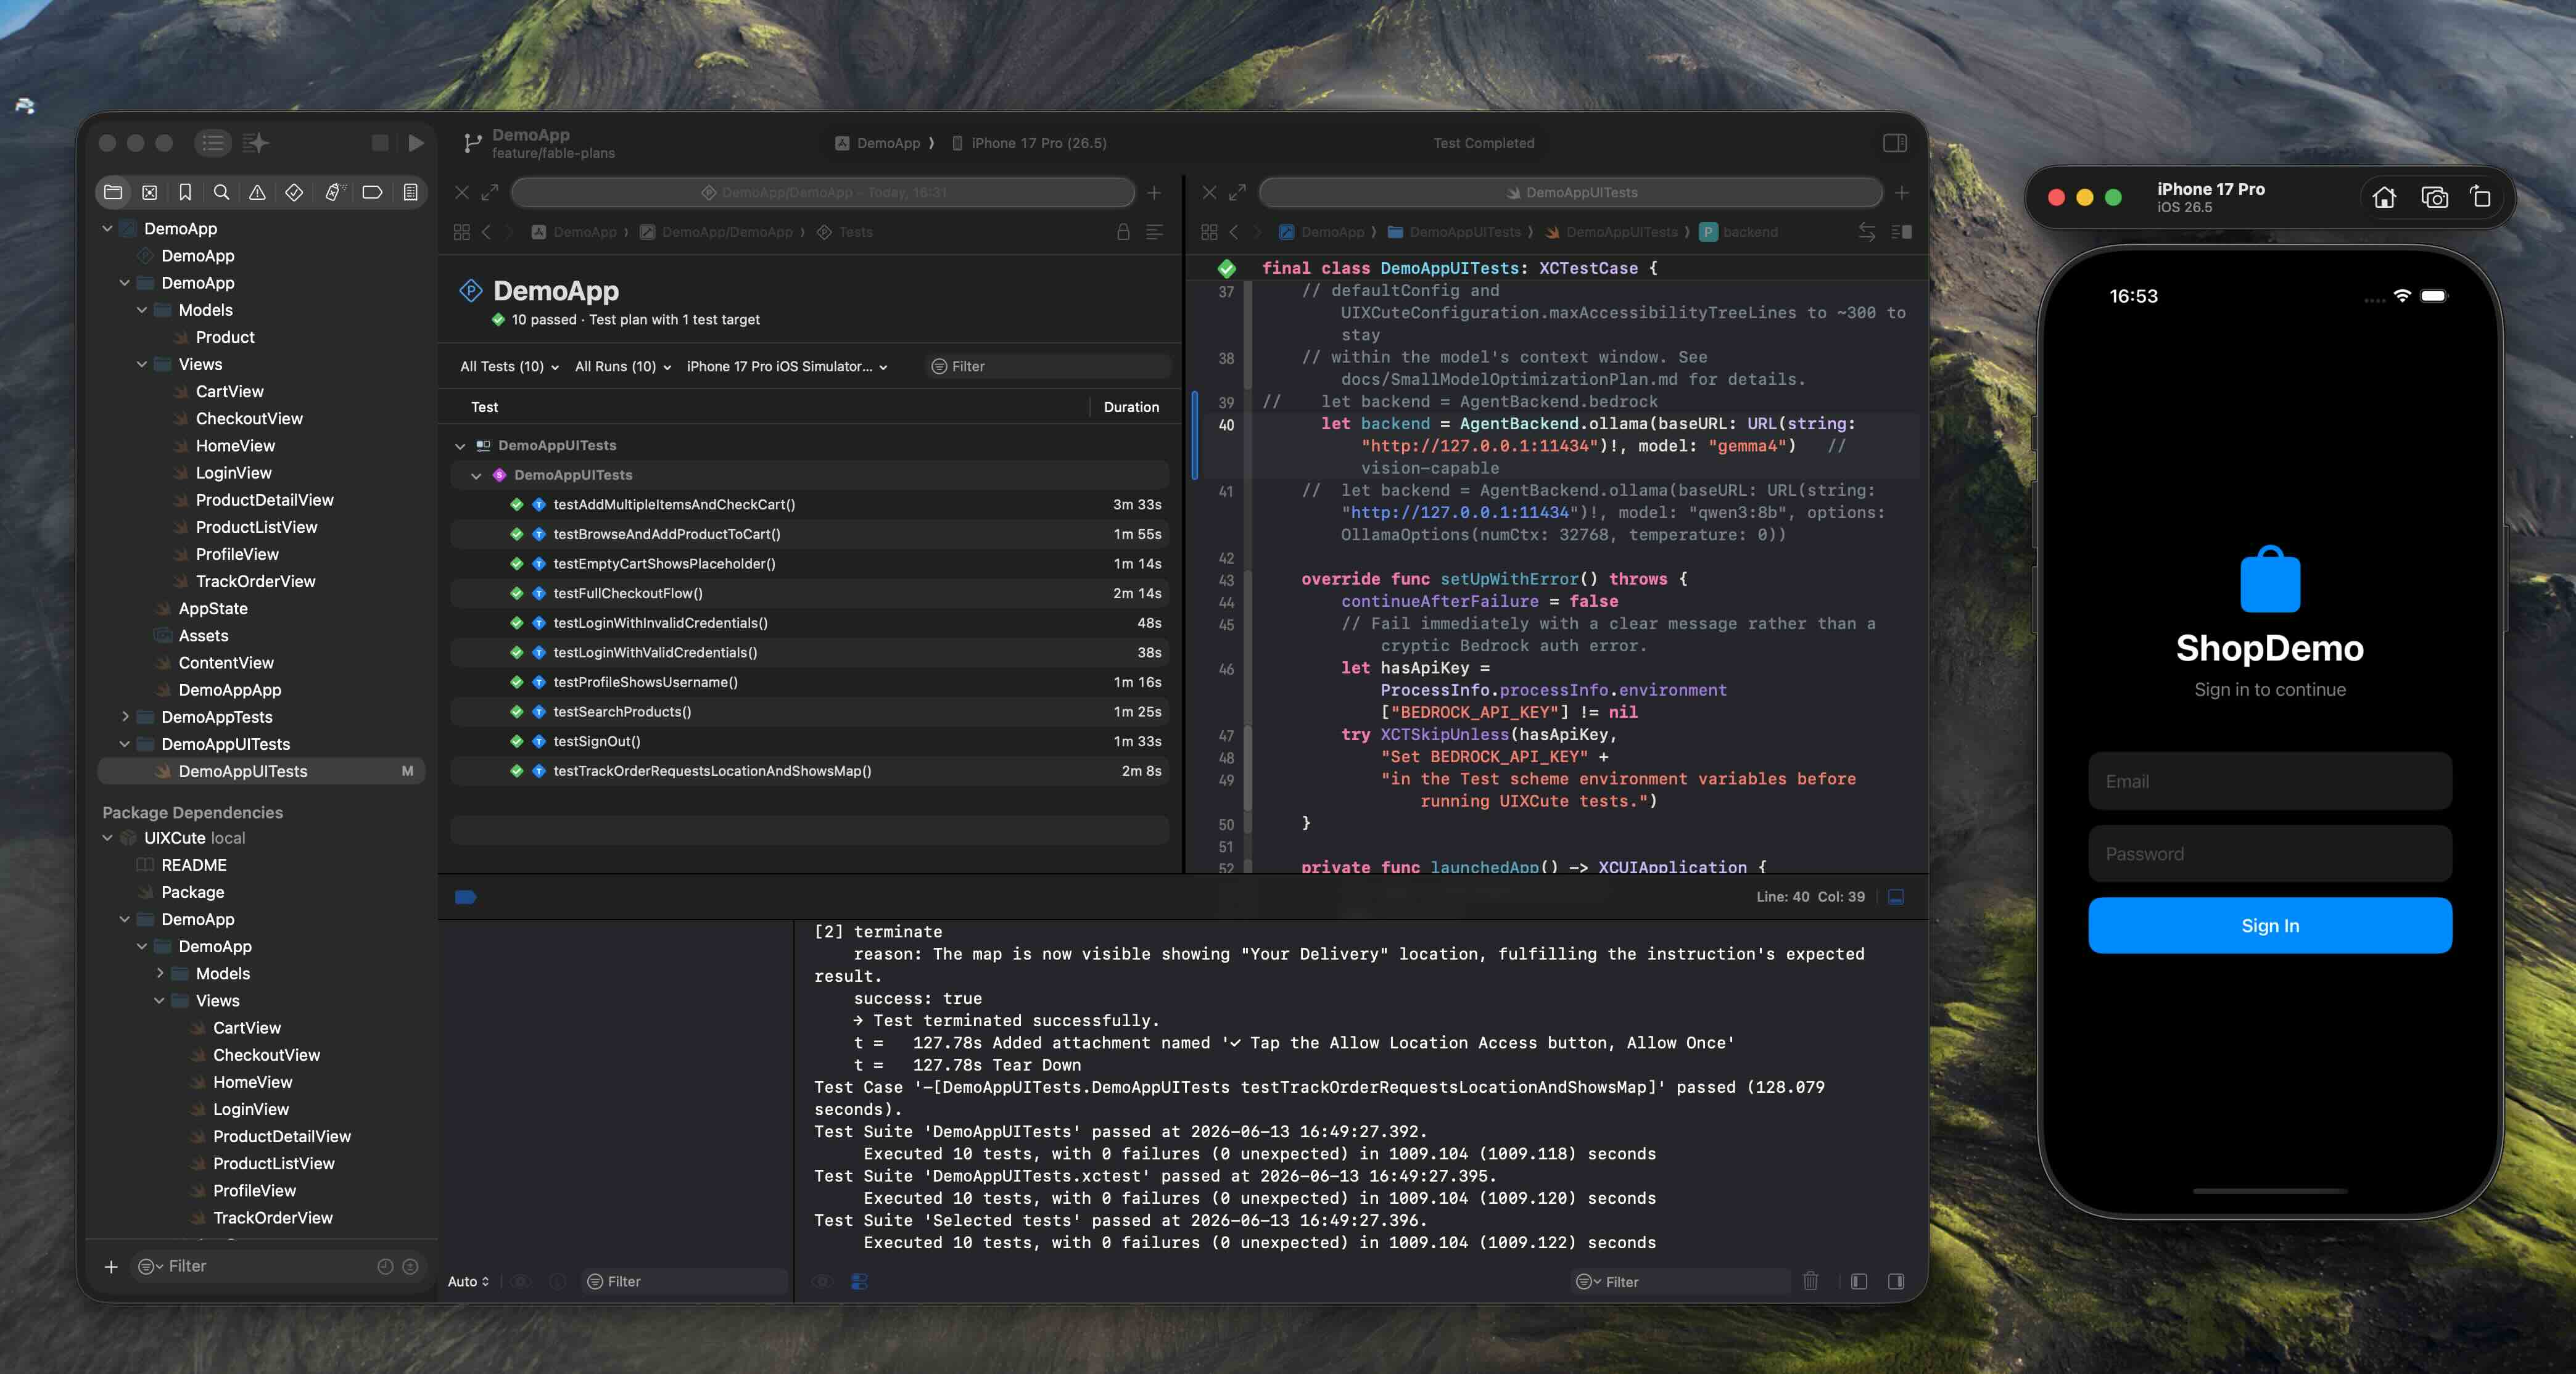
Writing Your First Test: The TrackOrder Demo
The UIXCute repository includes a demo app — TrackOrderView — that uses CoreLocation and MapKit. It's a good representative case because it triggers the iOS location permission dialog, which is a notoriously awkward thing to handle in XCUITest. Normally you'd need to add a addUIInterruptionMonitor handler, get the timing right, and pray. With UIXCute, the agent handles SpringBoard alerts automatically.
Here's how you'd set up the test:
import XCTest
import UIXCute

final class TrackOrderUITests: XCTestCase {

    let backend = AgentBackend.ollama(
        baseURL: URL(string: "http://127.0.0.1:11434")!,
        model: "gemma4"
    )

    func testTrackOrder() async throws {
        let app = XCUIApplication()
        app.launch()

        let agent = UIXCuteAgent(
            app: app,
            configuration: UIXCuteConfiguration(
                maxSteps: 30,
                totalTimeout: 120,
                perceptionMode: .screenshotAndAccessibilityTree,
                enableLogging: true
            ),
            backend: backend
        )

        try await step(agent, "Tap Track Order")
        try await step(agent, "Allow location access when the permission dialog appears")
        try await step(agent, "Verify the map is visible with a delivery pin")
    }
}
When the agent reaches the "Allow location access" step, it automatically detects the SpringBoard permission alert — which lives outside your app's XCUI hierarchy — and handles it without any extra code on your side. The agent knows to look for system alerts and surface them as a dedicated context block before deciding what to do.
To keep your test results readable, you can attach the execution report to Xcode's test results:
private func step(_ agent: UIXCuteAgent, _ instruction: String) async throws {
    do {
        let report = try await agent.step(instruction)
        attachReport(report)
    } catch {
        if let report = await agent.lastExecutionReport { attachReport(report) }
        throw error
    }
}

private func attachReport(_ report: AgentExecutionReport) {
    let text = report.steps.map { "[\($0.stepIndex)] \($0.toolName): \($0.resultSummary)" }
        .joined(separator: "\n")
    let attachment = XCTAttachment(string: text)
    attachment.name = "\(report.outcome)"
    attachment.lifetime = .keepAlways
    add(attachment)
}
The JSONL log (when logFileURL is set) gives you a complete trace of every LLM request and response — useful when a test fails and you want to understand what the agent was seeing.
The LLM Journey: From Haiku to Gemma4
UIXCute started life with a single backend: AWS Bedrock using Claude Haiku. That worked well, but it has obvious limitations — you need AWS credentials, it costs money per token, and your test data leaves your machine. I wanted to see how far I could push a fully local model, so I started adding Ollama support and iterating.
One meta detail worth mentioning: the architecture and implementation plan for UIXCute was designed with Claude Fable, while the actual code was written with Claude Sonnet via Claude Code. Using a more capable model for upfront design and a faster one for implementation turned out to be a good split — Fable helped reason through the protocol boundaries and the agent loop edge cases, Sonnet kept the iteration tight.
The journey happened in two pull requests.
PR #1 — Adding Ollama and Smarter Context Management
The first PR introduced the AgentBackend enum and the OllamaAgentClient. But beyond the backend switch, it also addressed some structural issues in the agent loop:
- Auto-context appending — after every tool call, fresh UI state is appended to the result, so the model always sees the current screen, not a stale snapshot
- Stale context trimming — old UI snapshots are removed from the conversation history to prevent O(n) token growth
- UI settle detection — before capturing context, the agent compares successive screenshots to wait for animations to finish
- SpringBoard alert handling — system permission dialogs are detected and surfaced as a dedicated
## System Alert (SpringBoard)section in the prompt - JSONL logging — every
converse()call can write a structured log record for post-hoc analysis
These weren't just nice-to-haves. Without stale context trimming, token usage grows with every step and small models start hallucinating or losing track of the goal.
PR #2 — Seven Optimizations That Took It from 7/10 to 10/10
After getting Ollama running with Gemma4, the initial pass rate was 7 out of 10 tests. Not bad for a first cut, but not good enough. I went through a systematic optimization process across seven phases.
Phase 1: Token Instrumentation
Before you can optimize token usage, you need to see it. I added a TokenUsage struct that tracks input and output counts on every converse() call and surfaces them in the execution report. Once I could see exactly how many tokens each step was consuming, patterns became obvious.
Phase 2: OllamaOptions — The Single Most Impactful Fix
This one surprised me. Ollama's default context window is 2048 tokens, which is nowhere near enough for the accessibility tree of a moderately complex screen. I added an OllamaOptions struct to control:
| Option | Value | Why |
|---|---|---|
num_ctx | 16384 | Fits a full accessibility tree plus message history |
temperature | 0 | Deterministic output — no randomness in tool selection |
keep_alive | "10m" | Keeps the model warm between steps (huge latency win) |
Setting num_ctx to 16384 fixed silent token overflow: the model was previously truncating context mid-message and producing garbled tool calls. Setting temperature to 0 made the agent's behavior consistent and reproducible. Together these two settings fixed three of the remaining failures.
Phase 3: Fuzzy Element Matching and Recoverable Failures
Small models sometimes refer to elements by a slightly wrong label — "Email Address" instead of "Email". Instead of throwing and failing the test, the agent now tries fuzzy matching (case-insensitive substring) and falls back gracefully. An action failure becomes a recoverable event that the model can learn from and retry with a corrected selector.
Phase 4: Hallucination Mitigation via Better Prompts
Large models like Claude can infer intent from context. Gemma4 needs more explicit guidance. I updated the system prompt to:
- State the current step goal literally (not paraphrased)
- Explain that a button "disappearing" means success (this confused the model early on)
- Include explicit success criteria using a new
step(_:expecting:)overload
// Before
try await agent.step("Tap the Allow button")

// After — explicit success criteria helps small models know when to stop
try await agent.step(
    "Tap the Allow button in the location permission dialog",
    expecting: "The dialog disappears and the map is visible"
)
Phase 5: Context-Size Caps
Even with a 16384-token context window, a long test sequence can overflow. I added two caps:
- Tree truncation — the accessibility tree is trimmed to its most relevant subtree when it exceeds a configurable character limit
- Message history cap — conversation turns older than N rounds are dropped, keeping only the system prompt, the original goal, and the most recent turns
Phase 6: Loop Guards
Two pathological cases caused infinite loops: 1. Repeated actions — the agent tapping the same button over and over when nothing changed 2. Step budget blindness — the model not knowing it was running out of steps
I added a repeated-action detector (same tool + same input three times in a row → abort with a clear error) and injected the remaining step budget into the context so the model can plan accordingly.
Phase 7: Validation and Documentation
The final phase was making sure everything was documented and testable. I added 13 new unit tests, updated CLAUDE.md with an OllamaOptions reference table, and verified that the full test suite passed with no warnings.
Result: 10/10 tests passing, with an average run duration of ~105 seconds per test on an M3 MacBook Pro.
Comparing Haiku and Gemma4: Speed, Cost, and Privacy
Once the optimizations were solid, I ran the complete DemoApp test suite with the original Bedrock backend (Claude Haiku 4.5, eu-west-2) to have a clean comparison.
| Claude Haiku 4.5 (Bedrock) | Gemma4 (Ollama, local) | |
|---|---|---|
| Total run time | 427 s (~7.1 min) | 1050 s (~17.5 min) |
| Pass rate | 10/10 | 10/10 |
| Input tokens | 292,311 | — (counted locally) |
| Output tokens | 11,235 | — |
| Cost | ~$0.35 | $0.00 |
| Data leaves your machine | Yes | No |
The 26:1 input/output ratio is worth noting: the dominant cost is sending accessibility tree snapshots and screenshots on every turn. The model's own tool calls (tap, typeText, terminate) are compact JSON. At $0.35 for the full suite, Haiku is surprisingly affordable.
So why bother with Ollama at all? A few reasons:
- Privacy — your app's UI state, accessibility identifiers, and test data never leave the machine. For apps under NDA or with sensitive test accounts, that matters.
- No AWS dependency — running UI tests in a local dev loop doesn't require IAM roles, Bedrock quotas, or a network connection.
- Iteration cost — $0.35 per full run sounds cheap until you're running 20 iterations per day during active development. Local is free.
Haiku is meaningfully faster (~2.5× in this run) and passes every test without the tuning work. If your team is already on AWS and your data policy allows it, Bedrock is the faster path to a passing suite. Ollama is the right call when you want zero cost and zero cloud dependency.
Key Lessons for Using Small LLMs in Agents
If you're building your own LLM agent — for testing or anything else — here's what I learned that applies broadly:
1. Context window size is a hard constraint, not a soft guideline. Small models don't gracefully degrade when you overflow the context — they silently truncate and produce garbage. Instrument your token usage from day one, set the context window explicitly, and add caps before you need them.
2. Temperature 0 is your friend for deterministic tools. When an agent needs to call specific tools with specific arguments, you want zero randomness. Sampling at temperature 0 makes failures reproducible and debugging tractable.
3. Small models need explicit goal completion criteria. A large model can infer "I tapped the button and the dialog is gone, so I'm done." A 7B model needs you to say that directly. The expecting: pattern — describing what success looks like — dramatically reduced the number of "still trying" loops.
4. Make failures recoverable, not fatal. Every action that can fail gracefully should. Fuzzy matching, retries with corrected inputs, and partial result logging turned hard crashes into soft recoveries that the agent could learn from within the same test run.
Getting Started
You'll need either an AWS account with Bedrock enabled or Ollama running locally.
For Ollama (recommended for getting started):
# Install Ollama
brew install ollama

# Pull the model
ollama pull gemma4

# Start the server
ollama serve
Then add UIXCute to your project's Package.swift:
dependencies: [
    .package(url: "https://github.com/Andrea-Scuderi/UIXCute.git", from: "1.0.0-alpha.2")
]
Add UIXCute as a dependency to your test target, create your first test with UIXCuteAgent, and run it. The demo app in the repo is a good starting point — clone it and run DemoAppUITests to see everything working end to end.
For AWS Bedrock:
Set BEDROCK_MODEL_ID and AWS_REGION in your scheme's environment variables, use the default .bedrock backend, and make sure your IAM role has bedrock:InvokeModel permissions.
Conclusion
Before I wrap up, let me be straight with you about when UIXCute makes sense and when it doesn't.
UIXCute is better than traditional XCUITests when:
- You're testing flows that are expensive to describe with selectors — multi-step journeys, dynamic content, screens that change frequently
- You need to handle system alerts (permissions, notifications) without writing
addUIInterruptionMonitorboilerplate - You want to get test coverage fast on a new feature before accessibility identifiers are even added
- You're experimenting and want tests that survive UI refactors without constant maintenance
Traditional XCUITests are better than UIXCute when:
- You need fast, deterministic CI — a selector-based test runs in seconds; an agent step takes 5–15 seconds and can occasionally reason wrong
- You're testing specific, stable interactions where the expected sequence is fixed and won't change
- You need 100% reproducibility — UIXCute with non-zero temperature introduces a small chance of different behaviour between runs (temperature 0 helps, but doesn't fully eliminate it)
- Your team has no tolerance for non-deterministic failures — a test that fails 1 in 20 runs due to model reasoning drift is harder to explain than a
XCTAssertEqualthat's either right or wrong
The honest assessment: UIXCute isn't a replacement for traditional UI tests. It's a complement. I use it for the flows that are painful to maintain with selectors, and keep selector-based tests for the critical paths where I need absolute confidence and fast feedback. The two approaches play well together in the same test target.
UIXCute is still early. The journey from 7/10 to 10/10 with Gemma4 taught me a lot about what small models actually need — but also showed that getting there required real engineering work that a simpler selector test would never have needed. That tradeoff is worth it for the right test, and not worth it for others.
What about using Claude CLI (or any external AI agent) instead?
A fair question. Tools like Claude Code with computer use can drive a simulator from the outside — take a screenshot, decide what to tap, send a click — without any XCTest integration at all. So why go through the trouble of embedding an agent inside Xcode?
| UIXCute (in-process) | External agent (e.g. Claude CLI) | |
|---|---|---|
| Xcode required | Yes — full Xcode to build and run XCTests | Yes — Simulator + Xcode CLI tools to run the app; full Xcode to build the IPA |
| App artifact | Built automatically by Xcode | Needs a pre-built .app or .ipa installed on the simulator |
| Access to accessibility tree | Full — native XCUIAutomation | Native via mcpbridge (Xcode 27 Beta); requires Facebook idb on earlier versions |
| Xcode test integration | Native — results in test navigator, attachments, CI | None — output is terminal text |
| Precision | High — taps exact elements by identifier | High — mcpbridge provides a UI hierarchy dump; always use that, never pixel-guess from a screenshot |
| Simulator control | Full — launch args, reset state, permissions | Full via mcpbridge — tap, swipe, type, hardware buttons, orientation, physical device support |
| Cost of failure | Clear XCTest failure with stack trace | Unstructured output, harder to parse |
| Token overhead | Minimal — tool calls are Swift function calls | mcpbridge ships 46 tools; all 46 definitions load into the model's context window on every request, adding latency and token cost |
| Best for | Regression suites, CI, structured test reports | Exploratory testing, one-off checks, physical device testing |
Xcode is required in both cases — there's no escaping it on iOS. The difference is what you need it for: UIXCute uses the full Xcode build and test pipeline, so the app is compiled and launched for you as part of xcodebuild test. An external agent needs the iOS Simulator (which ships with Xcode) to run the app, and you'll still need Xcode or its command-line tools to build the .app or .ipa to install on that simulator. So the setup cost is similar; UIXCute just keeps everything inside the familiar Xcode workflow.
Xcode 27 Beta's mcpbridge narrows the gap significantly. It gives an external agent a unified interface for device interaction: synthesise taps, swipes, text input, hardware button presses, and orientation changes on both simulator and physical device, then capture the resulting screenshot and UI hierarchy after each action. That means precision is no longer a weakness — as long as you drive the agent from the hierarchy dump rather than pixel-guessing from a screenshot, element targeting is reliable. The old dependency on Facebook idb for accessibility tree access goes away entirely on Xcode 27+.
Where UIXCute still has the edge is CI integration and token efficiency. It sits inside the XCTest process and produces native test results — failures in the test navigator, attachments, structured reports that your CI pipeline already knows how to consume. An external agent's output is terminal text; parsing that into actionable CI signals requires extra work. There's also a non-trivial token cost to consider: mcpbridge exposes 46 tools, and every one of those definitions is loaded into the model's context window on each request. That overhead adds up over a long test run — in both latency and API cost. UIXCute avoids this entirely; its tool surface is a handful of focused Swift functions with no per-request schema overhead. The external approach (especially with mcpbridge) is a strong fit for exploration, one-off checks, and physical device testing; UIXCute is the right tool when you need structured, reproducible reports and predictable running costs.
I'd love to hear how you use it. Open an issue, send a PR, or reach out — the project is very much a work in progress and real-world feedback is the most valuable thing at this stage.
That's all! Thanks for reading the full article, I hope you liked it.
References
- UIXCute on GitHub — the full source
- PR #1 — Ollama backend, SpringBoard alerts, context management
- PR #2 — Small-model optimizations: 7/10 → 10/10 with Gemma4
- UITestFindings.md — full test run data, token usage, and cost breakdown
- Ollama — run LLMs locally on your Mac
- Gemma4 on Ollama — the model used in this article
- Apple XCUIAutomation documentation — the XCTest UI testing reference
- Giving external agents access to Xcode